PolyWorld Terrain.
Select your Unity Terrain, then add the QT_PolyWorld Terrain component to it.
Polyworld generates faceted terrains from the familiar Unity Terrain system with a click of a button. Swap back and forth between the Unity Terrain and Polyworld painlessly. Need to adjust the topology or texturing? Just paint on the Unity Terrain and hit the “Update All” button to update. Need to update the color” Hit the “Update Color” button. It’s super easy.
Before you dig in, it’s incredibly important you understand how to properly setup your initial Unity Terrain. With certain values, your Polyworld Terrain might be too big, or too high poly. Get an in-depth look on how to properly setup a Unity Terrain by visiting the Terrain In-Depth link.
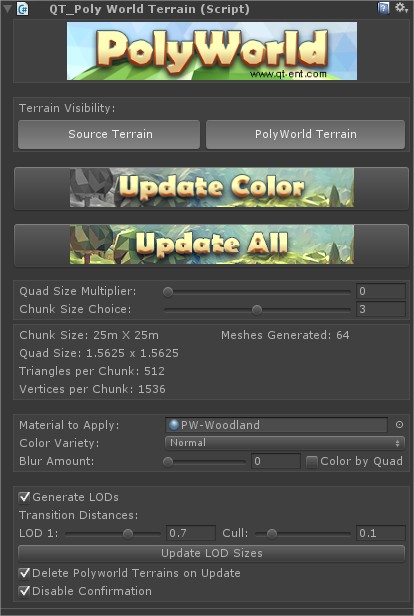
- Terrain Visibility buttons toggle between PolyWorld and Unity terrains.
- Update Color just renders the color map to the PolyWorld terrain.
- Update All will update topology and color to the PolyWorld terrain.
- Quad Size Multipler adjusts how big the quads are in the resulting PolyWorld terrain.
- Chunk Size Choice: how large and how many terrain chunks will be created for your terrain.
How does this terrain component differ from the old one?
- It’s about 100x faster at generating terrains.
- Chunking is always done so your terrain is no longer one big expensive mesh.
- An LOD level is created to help with performance!
- Terrains of any shape and size is now supported
- Better color control
- Improved workflow now that it’s a component.
- Much more stable.
Terrain Tips
- To get more color variation, set your texture tiling to high values instead of low values like we normally do. All the color and value variation that’s in that texture will get transferred into the Polyworld Terrain. I get nice results when I set the texture tiling values as big as my terrain.
- If portions of the Unity Terrain are extremely smooth, the vertex colors on the Polyworld Terrain will not render faceted. Just add some very subtle height variation in those areas and regenerate to fix.
- When making caves, use the terrain as the cave floor, then make a new terrain for the ground above the cave. Consult the Woodland Demo scene on this is done.
- Terrain Toolkit can be used to create Polyworld Terrains. If you use any script or plugin that edits default Unity Terrains, it will most likely work with Polyworld. If not, contact me and I’ll see what I can do.
PolyWorld Mesh Converter
Located in Window->Quantum Theory->PolyWorld Mesh Converter
There are a few simple requirements for the mesh converter to run:
1. You must not be converting the mesh while on the iOS platform in Unity. I can’t read mipmaps under iOS’s compression scheme. Instead, make your conversion under Standalone and then switch back to continue development on iOS.
2. The mesh must be part of a prefab.
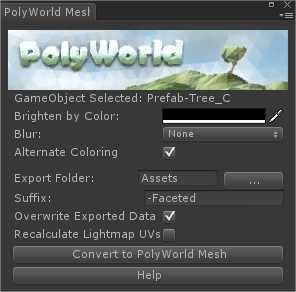
- Brighten by Color: a color swatch that takes your base vertex colors and adds the color you choose. Black has no effect.
- Blur: specifies 1 of 3 possible mip maps to use in the color calculation. None uses the highest mip. Some uses the middle mip. Full uses the farthest mip.
- Alternate Coloring: turns on Bilinear Filtering for color calculation which results in more gradual color changes across the model. Disabling this uses Point Filtering which has more
harsh changes. - Export Folder: Clicking on the “…” button allows you to specify an output folder.
- Suffix: add your own suffix to append to the new prefabs created.
- Overwrite Exported Data: overwrite any data found in the export data upon converting.
- Recalculate Lightmap UVs: recalculates lightmap uvs
Mesh Combine
Located in Window->Quantum Theory->Mesh Combiner

This script will take gameobjects with mesh filters you’ve selected and combine them together based on the number of unique materials it finds.
- New Mesh Name: the name of the gameobject that’s created. If none is specified, the objects will be autonamed.
- Draw Calls in Selection: self explanatory.
- Draw Calls Combined: The number of draw calls after these objects are combined.
- is Static: Make the combined object static.
- Generate Lightmap UVs: the combined object generates lightmap uvs.
- Cast Shadows: the combined object casts shadows
- Receive Shadows: the combined object receives shadows.
- Keep Layer Choice: the combined object’s layer will be the same as the first object in the selection.
- Add Mesh Collider: automatically add a mesh collider.
- Remove Original: deletes the selection from the scene after combining them.
- Export Path: the current path in which to export the new prefab.
- Set Path: sets the export path.
- Combined Selected: combines the selected meshrenderer gameobjects into as few drawcalls as possible and makes a prefab in the export folder.
SurfaceNoise
This is the Surface Noise shader!
- Offset Map – a black and white texture used to move the vertices. use “OffsetMapA” which is included.
- Color – an option tint color
- Intensity – Height of the waves
- Tiling – frequency of the waves
- Speed – the speed, and direction, of the waves
- Smoothness – reflectivity just like the Standard Shader
- Metallic – metallicity just like the Standard Shader
- Wave Direction – the world space direction of the waves
Modify Color
*only in Ancient East Toolkit